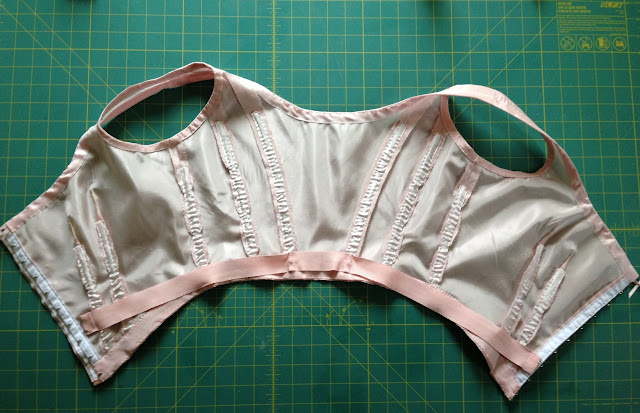
First I trimmed, clipped, and scalloped all the seam allowances. Then, I overcast them all by hand. I sewed boning casings to each seam, again by hand. To ensure that the bodice sits smoothly over the boning, I followed a process described in period dressmaking manuals. As I stitched the casings down to the seam allowances, I left extra ease in the tape for a few inches in either side of the waistline, where the body has the most inward curve. Then, when I inserted the boning, I stretched the bodice lengthwise, causing the boning to bow in slightly. If you don't follow this process, the bodice may crinkle slightly at the waist when worn. It is a simple but ingenious way to ensure a smooth fit.
Next, I finished the neckline with a cotton ribbon as a facing and ran a narrow ribbon through it to use as a drawstring to draw up the neckline as needed. I then applied bias facings to the armscyes and to the bottom edge, which I interlined with a bias strip of tarlatan to give it structure. Lastly, I made a waist stay out of petersham and tacked it onto the back seam allowances. I sewed the bodice seams by machine, but after that every step of the process was completed by hand. The only shortcut I took was to use hook-and-eye tape for the bodice closure, instead of sewing on individual hooks and eyes. It's not the prettiest finish, but at least I was able to use my machine!
Here's the completed bodice base:
On the dressform
Back view
Laid flat
Inside
Armhole facing
Bottom Edge
I have made a lot of progress on the skirts (yes, there are two). As soon as the outer skirt hem is finished, I'll post some pictures.


It looks utterly perfect! I look forward to seeing how your Gibson gown comes together. You always looks a picture :-)
ReplyDeleteGorgeous! Your craftsmanship is always impeccable.
ReplyDelete