Wednesday, March 20, 2013

Gibson Girl Gown Progress

This week I finally started my Gibson Girl ball gown!

After much study and deliberation, I have formulated a game plan. My vision for the dress is a bodice based loosely on this dress:
1898-1900 Jacques Doucet, Met Museum
I love the draped crossover bodice with chiffon peeking out at the neckline, and I'm really into the idea of shoulder drapery, though I will probably use more chiffon instead of flowers. 


I want my skirt to have a little more visual interest, so I'm thinking about a flounce and embellishment inspired by this dress:
1898-1900 House of Worth, Met Museum
Though I'm sure I won't have the patience to cover my flounce in spangles, I very much like the line of applique/embroidery where the flounce attaches to the skirt. 


To plan the actual construction of the dress, I have been consulting all my usual reference books and resources. In addition, I have found Cathy Hay's Worth Oak Leaf dress diary especially insightful. She faithfully recreated an incredible 1903 evening gown by the famous design house, right down to the insanely detailed embroidery. Here's the original dress:
1903 House of Worth

And yes, her version is about as jaw-droppingly beautiful as the original. While I have absolutely no intention of putting even a tiny fraction of the effort she did into the embellishment of my gown, I found her notes, photographs, and diagrams of the dress immensely helpful. Please go visit her site and enjoy it as much as I have. 

In addition to her dress diary, I have studied period patterns and dressmaking manuals, patterns taken from extant dresses, and photographs of dresses in museum collections. Based on these sources, I have identified a few nearly universal techniques for the construction of evening/ball gowns from this period: 

1. The bodice, rather than being flat-lined, is built over a separate silk lining, sometimes an off-white color, sometimes a shade to compliment the outer fabric. This bodice base is boned and has a petersham waist stay, and has its own closure in either the front or the back. 

An example:
1897 House of Worth, Met Museum
This photo is intended to show the stay tape and label, but it also shows inside of the bodice base. Notice all the vertical seams and the hand-finishing. Seam allowances are overcast, bone casings and stay are hand-stitched in place, and the bottom edge is finished with a facing or tape. You can see the outside fabric (actually a piece of ribbon in this case) peeking out from the bottom. It is clearly separate from the lining. 


2. The outer layers of the bodice are arranged and applied to this base. They have their own closure, either concealed in their drapery, or along one of the side seams. The careful placement of closures completely disguises the openings. 

The same bodice as above, but from the outside this time:
1897 House of Worth, Met Museum
It is clear that all the frill and frouf that constitutes the outside of the bodice is lightly applied to the exterior, and is not in any way structural. The boned lining provides all the structure, the rest is just decoration. This is true even of more solid-looking bodices, like the silver-blue Worth dress above. 

Here is its bodice laid flat:
1898-1900 Worth, Met Museum
If you look closely at the inside back edge, you'll see the outer fabric floating free from the lining, which has a drawstring at its upper edge (also a common feature). That back piece wraps across the back from the right hand side of the body to the left, where it fastens with hooks and eyes along the side seam (just visible in the full-length photo up above).

3. The skirt is usually separate from the bodice and has a free-hanging lining. This lining serves as a petticoat, with rows of ruffles to help fill out and support the bottom of the skirt. The skirts close at the center back. 

You can see the free-hanging skirt lining in this dress:
1899 House of Worth, Met Museum


Within the framework of these general guidelines, there is a huge amount of variation in the patterning, cut, layering, and ornamentation. The bodice linings are fairly standard, following the common bodice shapes of the 1890s, but the skirts can be cut in any number of ways. Most are gored, but the size, shape, and number of gores vary widely. Some skirts are cut with only a single front gore, paired with large circular-cut panels extending to the back. A very few skirts are cut in a single-piece, circle skirt layout, though the narrow width of period silks makes this an uncommon technique. The gored skirts tend to have some pleating or gathering where the back portions attach to the waistband, while the circular skirts tend to be fitted much more smoothly over the hips. 

I prefer this smooth-fitted approach, and also like the easiness of a circular skirt — fewer seams — so I plan to cut my skirt as one large circular shape. If you take a look at the diagram of the Worth dress by Cathy Hay, you will see the shape that I am using for my skirt. This is supported by a dress in Janet Arnold, as well as a few period patterns in The Voice of Fashion.  

I have decided to make my dress without a train, even though they were very popular in this period. Every extant dress I have seen has a long sweeping train, but I personally have no desire to experiment with dancing in one. I have seen written references to "dancing length" dresses, showing that at least some women thought about foregoing the fashionable trend in favor of practicality. But without having seen even one example of such a dress, I am doubtful as to the historical accuracy of my choice. Since I am wearing this to a ball where I will be dancing for hours, I have decided that I am willing to compromise historical accuracy in order to be able to dance without fear of me or anyone else stepping on my elegant train and tearing it to pieces. These are the choices we costumers must sometimes make. 

Here's a lovely painting showing ladies dancing in dresses that do not appear to have long trains:
The Ball, Victor Gabriel Gilbert

For my bodice base, I am using the basic 1890s bodice pattern from Period Costume for Stage and Screen (pg 146-7). I considered using the Truly Victorian 1892 Ball Gown Bodice, which would have given a similar shape (raising the bottom edge, and dropping the giant sleeves of course), but decided to save my money and just work with the pattern from the book. I was very lucky, the pattern required very little alteration once I scaled it up. 

While doing this research and planning my patterns, I was also collecting materials. I found a muted blue-green silk taffeta for the main body of the dress. To trim it, I decided on a pale pink silk chiffon for the drapery and skirt flounce, and a peachy rose silk taffeta for accents. For lining, I settled on a pale pink acetate taffeta; I would have bought silk, but couldn't justify the extra expense for something that no one will really see. It has a similar hand and body to silk, and it breathes. At $3/yard, I couldn't resist.

For embellishment, I bought a beaded trim in grey and silver that I thought was somewhat evocative of the cloud motifs on the blue Worth dress above. I also plan to accent the dress with black velvet. 

Here's a picture of all my materials together:
From left to right: pink acetate taffeta for my lining, blue-green silk taffeta for the body of the dress (shown with the grey and silver beaded trim for embellishing the skirt), peachy pink silk taffeta for an accent color, pale pink chiffon for the neckline/shoulders and the skirt flounce (shown with black velvet ribbon, which will get worked in somewhere)

I have already made mockups of my bodice base (from Jean Hunnisett) and my skirt pattern (from the Oak Leaf dress and a dress in Patterns of Fashion by Janet Arnold, pg 50-51). I cut out the bodice lining, the skirt lining, and outer skirt over the weekend, and will hopefully start sewing my dress this week!

I'll post an update once I have something worth seeing. 


Monday, March 11, 2013

Knitted Garters

The latest challenge in the Historical Sew Fortnightly, Challenge #5: Peasants and Pioneers, was somehow very difficult for me. I spent most of the fortnight wondering what on earth I could make that would fit the challenge and also be useful to me. I don't do any serious reenacting or living history; my historical dressing consists almost entirely of wearing ball gowns to local themed dances. The only real opportunity I have of dressing in simple everyday clothing is the Dickens Fair, and I just made myself a completely new ensemble for that last fall.

I wracked my brain for 12 of the 14 days, then woke up Saturday morning with a plan: I would make a small, simple knitted project. While knitting can be very complex and delicate, it can also be quite practical and workaday — perfect for the current challenge. Upperclass ladies of leisure might knit fancy silk purses, but every working class woman learned to knit as an economical way to provide her family with stockings and other useful articles. After a quick brainstorming/internet-surfing session, I decided to make knitted garters. They are a small, quick knit, can be worn with the fanciest of ball gowns, but would have been made by even the lowliest peasant girl in the 19th century as an opportunity of honing her knitting skills.

The first search hit on Google for "knitted garters" leads to this lovely post from the blog World Turn'd Upside Down, complete with a pattern and helpful interpretive drawings. The pattern was published in Godey's Lady's Book in 1862, but is similar in style to instructions found in the Workwoman's Guide and other earlier sources.

I present to you my peasant girl knitted garters:

The Challenge: #5 — Peasants and Pioneers

Fabric: None

Pattern: "A New Style of Garter" from Godey's Lady's Book 1862, as shared and explained on World Turn'd Upside Down

Year: 1862, but appropriate for any part of the mid-19th century

Notions: Fingering weight wool yarn from my stash (white and burgundy), size 1 knitting needles

How historically accurate is it? Very accurate. The materials are very close to what would have been used, and I followed the pattern exactly. The only part I'm not certain about is the needle size, but I think I was pretty close. 

Hours to complete: 5-6

First worn: Will be worn later this year

Total cost: Nothing — materials came entirely from my stash. 


Here they are tied. They're not holding anything up, as I don't have any period appropriate stockings to wear them with yet. 


I love any excuse to make a tassel. 


This is the drawing that accompanied the original pattern. I did pretty good, I think!


Wednesday, March 6, 2013

1830s-1840s Underpinnings


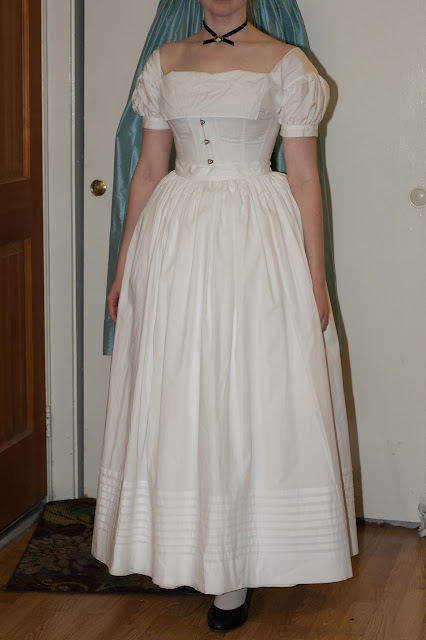
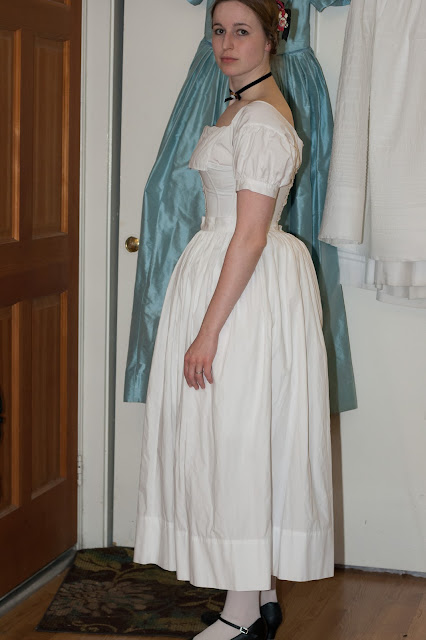
Here are my 1830s-1840s underpinnings, as worn last week with my blue late 1830s ball gown (seen hanging in the background of all these pictures). They were also worn in December with my brown wool Dickens Fair dress.

The finished effect:
1830s underpinnings

Now let's break down what goes into giving me this silhouette.

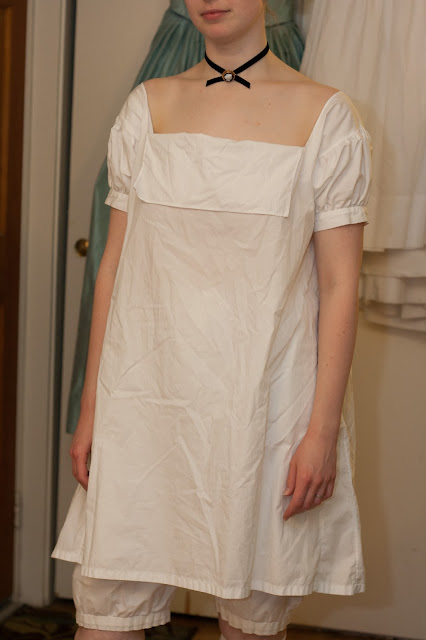
First, a hand-sewn chemise made from diagrams and instructions in the Workwoman's Guide. It is a transitional style, bridging the gap between the squares-and-rectangles shifts of the early 19th century and the curved and gathered yoke chemises of the 1850s and 1860s. It is still cut entirely in rectangles and gores, but has full, gathered sleeves and a front flap to cover the top edge of the corset:

1830s chemise
I wish I had pressed it before taking these pictures.

1830s chemise detail

I based my chemise primarily on this historical example:


Luckily for me, this chemise is documented in Costume in Detail (pg 173-4). It also has many traits in common with chemises in the plates for the Workwoman's Guide. Mine is hand-sewn from pima cotton broadcloth (though it should more properly be linen). I think it is beautiful, and it is perfectly comfortable to wear under my day dress, but I don't think I'll wear it again with a ball gown. It is very difficult to get it to sit right with a lower neckline, and when dancing the shoulders tend to fall down. They then bind and pinch and make my shoulder/upper arm very uncomfortable — not ideal for an evening of dancing. This doesn't happen when worn with a higher neckline, as the chemise can then sit properly up on my shoulders. 

Over the chemise, I wore my go-to mid-19th century corset, a heavily modified version of Simplicity 9769

mid-19th century corset

It fits pretty well, is fairly comfortable, and gives a nice silhouette. However, I wish it had more hip flare (something my corsets pretty much always need). I also experience some lower back pain after a few hours of dancing in it, probably a consequence of not having enough room in the back hip area.  I think this summer I will make a replacement, maybe something with gussets and hip gores to allow for a curvier shape. 

Next I added a bustle pad:

bustle pad

bustle pad side view

I find that despite my natural rear padding, my skirts don't achieve the desired fluffy bell curve in the back without some additional padding. I initially tried a smaller round-ish pad, maybe 6-8" across and 5" or so deep. (I wore that bustle with my Dickens Fair dress.)  I found, however, that it didn't provide quite enough floof for my taste, and so made this larger, thicker bustle the morning of the ball. It extends all the way to my sides and is more tightly stuffed than my last bustle. In these pictures, it almost seems like too much bustle, but the wool batting inside compacted slightly as the night wore on, and I'm quite happy with the resulting shape. It is sewn from white linen, with cotton twill tape ties. 

Now for the petticoats: 
First is a simple base petticoat of two 45" panels of pima cotton broadcloth, hemmed to lower-calf length: 

petticoat 1

petticoat 1 side

The next layer is a corded petticoat:

corded petticoat

corded petticoat side

I labored over this for months (all hand-sewn, remember), but I think it was well worth it. It is two 45" panels of plain cotton muslin with Sugar 'n' Cream cotton yarn for the cording. When I started, my plan was to fold up a deep hem, sandwiching rows of cording between the fabric layers, as shown in this tutorial by The Laced Angel. You can see that there are about 35 rows of cording at the hem of the petticoat done in this style. Those 35 rows took forever!! (Did I mention I was doing this by hand?) 

corded petticoat detail
Miles and miles of cording!!

I decided to speed things up a bit by changing to another method of cording, the one demonstrated in this tutorial at Historically Dressed. Each row of cording is sewn into a small tuck in the fabric, wrapped tightly the same way you would make your own covered piping. With this style of cording, each tuck takes out a little bit of the petticoat's length, so remember to plan accordingly. Otherwise, you'll have to do what I did and add some extra fabric on top to make the petticoat long enough. This method went much faster and enabled me to actually finish the petticoat, instead of throwing it away from myself in frustration. I started by spacing my cords about 1/2" apart, but the spacing got wider as I went up the petticoat (and grew increasingly impatient to be finished with it). Luckily, that was a common look in period examples, like this one:


As an additional FYI, I find that this second method of cording gives much more volume and support than the first method. They both stiffen the fabric considerably, especially with a good starching, but the tucked cording resists crumpling more than the sandwiched cording. 

On top of the corded petticoat is a plain petticoat with a deep hem and one 1/2" tuck (added to shorten the petticoat):

petticoat 2

petticoat 2 back

And one final petticoat, this time with a shallower hem and eight 1/2" tucks (it started with seven, as I prefer the aesthetic symmetry of odd numbers, but this petticoat also needed shortening):

tucked petticoat

These two outer petticoats are both made from two and a half panels of 45" pima cotton broadcloth, to a total circumference of ~110".

Look at that fluff!! Who needs hoop skirts anyway? I love the soft bell silhouette, and all those layers are wonderful to move and dance in. Instead of the pendulous swinging of a crinoline, you get a soft, rustling swirl of fabric. It's delightful.

tucked petticoat side

tucked petticoat back
So much floof!

The crucial step to ensure that you get the desired volume with petticoats alone is to starch the heck out of them. I use plain old cornstarch. The process in brief:

1. Make a solution of starch and water. It doesn't take much — 1/4 cup starch to a quart of water, dissolving the starch in a small amount of water first before adding the rest. 
2. Boil it for a minute or two until it thickens. 
3. Let it cool, and dilute it as necessary. 
4. Dunk the petticoats, then squeeze out the excess (I use a spin cycle in my washing machine). 
5. Hang to dry. 
6.When you're ready to press them, it's best to dampen them slightly first. This gives them a smooth glossy finish.  

Here's a great shot of my petticoats after starching (but before pressing): 

starched petticoats
They are literally standing up on their own. 
(The cat is included for scale — no, he was just being nosey.)

Starching takes a long time, and must be repeated every time you wash the petticoats, but it is so worth it. Not only does it greatly enhance the floof factor, but it makes the fabric crisp and rustley — very satisfying.  

To see what these petticoats look like under dresses, visit these previous posts:

Late 1830s Ballgown

Well, I've had a busy couple of weeks! Two different balls, two completely different costumes — so much sewing and preparation, I haven't had a lot of time for blogging. Time to catch up!

Two Saturdays ago, I attended the Gaskell Ball in Oakland, wearing a dress I made and wore for the first time last year, but never properly photographed. This time around, I had my husband take a ton of photos so I could share them here.

The finished ensemble:

Late 1830s Ball Gown


There is a bit of back story to this dress — it has has actually been through a few incarnations. I bought the fabric about 4 years ago to make my very first "Victorian" ball gown. It was also the first large sewing project I tackled when I started sewing again after college. Fearless and over-confident in my meager abilities, I bought 5 yards of very nice blue silk shantung and jumped right in. I had no idea what I was doing, but managed to pull off a fairly accurate-ish 1850s gown that I wore a few times, re-trimming it over and over again with varying degrees of success. The skirt was made to fit over a (rather too large) round hoop, and the bodice was draped with the help of a friend, but never fit well enough for my taste. I can't seem to find a single decent picture of the early incarnations of this dress. (This is why I started this blog, so I won't wear costumes without photographing them!)

After re-trimming it for the third or fourth time, I grew tired of the thing, and tossed it in the closet. I then made a series of new ball gowns, most of which were made to fit over a gigantic mid-1860s elliptical crinoline, and forgot about the blue dress entirely.

Last year, I decided to take a break from large hoop skirts and made a series of petticoats that would suit the 1830s and 1840s. I wanted a ball gown to wear with them for the summer Gaskells, but I didn't have time to plan and make a whole new dress. Just when I was starting to contemplate wearing one of my old dresses instead, I happened to find 1-1/2 yards of the same blue silk shantung at a remnant sale at the shop where I originally purchased my fabric. The universe seemed to be telling me to resuscitate the blue ballgown languishing in the back of my closet. I snatched up the remnant and got to work. I used the skirt from my original dress (3 panels of the 54" wide silk), but shortened it and pleated it to a new waistband. The remnant of silk became a new late 1830s bodice and I had a brand new (looking) dress!

My goal was to achieve that slightly frilly, yet relatively restrained look that served as a transition from the over-the-top Romanticism of the 1830s and the tight, angular Gothic sensibility of the 1840s. The style of my dress fits into a narrow window of about 1837-1840, when the giant gigot sleeve of the mid-1830s had collapsed, pleated tightly to the upper arm, but with fullness retained just above the elbow. Here's a fashion plate illustrating the silhouette:

1839

My bodice is taken from the Truly Victorian Romantic Era dress pattern (TV455), but with a sleeve I drafted myself. Without the pleating on the upper arm, the sleeve would be simply a giant puff. All the extra fullness is controlled on top with narrow knife pleats that were stitched in place before the sleeve was made up, leaving a puff at the bottom. I covered the stitching lines with bands of a not-quite-matching blue velvet ribbon, which I also used to trim the bow on the front of the dress.

Late 1830s Ball Gown

The dress was made in a hurry, and the pattern was easy and well-drafted (I've really come to expect that from Truly Victorian). It actually fits me a bit better than it looks in these pictures — my corset was laced a bit tighter than it should have been. I used hook-and-eye tape for the back closure, the first time I've done such a thing for a period dress. Apparently it is less incorrect than it seems. Anyway, it worked and was faster than sewing the hooks and eyes one at a time.

Late 1830s Ball Gown back view

Late 1830s Ball Gown side view

The black netted silk mitts were purchased from Lacis in Berkeley. The store owner told me that they were commissioned for the store back in the 1970s, and were made using an old machine from the 19th century. Pretty fabulous, I think. They only cost $30, and held up perfectly to a night of vigorous dancing.

Late 1830s Ball Gown bodice detail

I am wearing a black velvet neck ribbon, fastened at the throat with my grandmother's cameo (which makes frequent appearances with my costumes). I don't know much about it, but I'm guessing by the style of the pin closure that it is from the 19th century. It has a small hinged loop that allows it to be worn as a pendant as well as a brooch. So versatile and appropriate.

I carried a cheap paper fan that happens to match my color scheme perfectly. (I bought a handful of these fans at Daiso last year —they are cheap enough that I wouldn't mind losing them, but work well for keeping me cool between dances.)


Late 1830s Hairstyle

My headpiece is a recycled and re-trimmed bit of fluff — silk ribbons, assorted flowers, and a scrap of antique chantilly lace, stitched delicately onto a frame of covered millinery wire. 

Late 1830s Ball Gown

All those elements come together quite nicely, I think. The outfit was fun to wear and was just different enough from the typical 1850s cupcake dresses that are usually seen at Gaskells. 

Curious about what's going on underneath that skirt? Underpinnings are coming up next!