The Challenge: #2 UFO
Fabric: Lightweight Cotton Sateen
Pattern: Past Patterns #001
Notions: Metal Grommets size #00, wooden busk from Hedgehog Handworks
How historically accurate is it? The pattern was taken from an original and came with detailed historical notes and instructions. I sewed it completely by hand, and my materials were very accurate. The only thing I'm not sure about are the metal grommets, as I don't think they were invented until the 1830s or so.
Hours to complete: Too many — for this challenge, it was only 2-3
First worn: Will be worn March 2013
Total cost: Approximately $40 (including pattern)
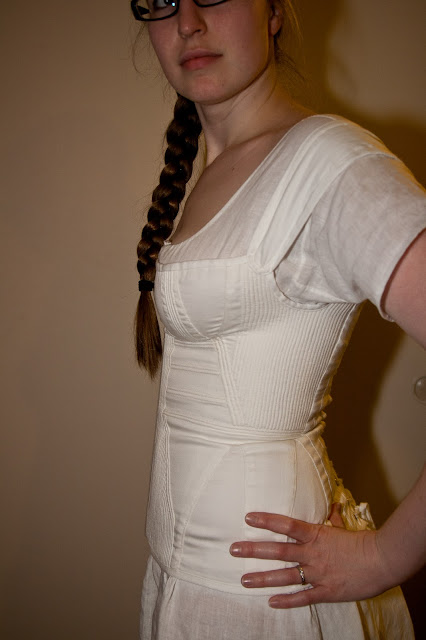
The corded stays are now much improved, and should be perfectly wearable. Here are some before and after pictures to show the changes I made:
Before...
...and After
Before...
...and After
Before...
...and After
It's much better, don't you think? I made all the changes I proposed in my previous post, the most important being a new busk and better strap placement. The bustline is more lifted and perky, which is essential for Regency dresses, and the straps stay up much better than before. I am not sure that I completely love these stays, even with all the changes I made — the shape through the bust still leaves something to be desired. However, they are much better than before and will provide a nice silhouette under clothing, which is all I really need them to do.
Speaking of which, today I started putting together my muslin dress (the whole reason I needed the stays). I'll post some pictures and details later. Stay tuned!


I've just bought the pattern for these stays, and I have to ask what you did for the back stays. The pattern said to make two narrow wooden back stays in addition to the busk, but you didn't mention what you did for this part. Any suggestions?
ReplyDeleteWhen I set out to sew these, I marked the casings for the back stays and sewed the channels, thinking that I would use steel boning or somesuch. When I got them finished, I decided that they didn't need anything there at all. These stays are not laced very tightly, so the wrinkling and pulling at the lacing is minimal, and they're much more comfortable without. I've seen just as many period stays without stays along the lacing as I have with them, so I figured it was acceptable to leave them off.
ReplyDelete