Showing posts with label Edwardian. Show all posts

Wednesday, May 1, 2013

Gibson Girl Gown — Complete!

And now, the moment you've all been waiting for... the finished dress!

Front

Back

Bodice Closeup

Details

The shoulders — my favorite part of the dress


It's a shame the colors are so washed out in all these pictures, but I figured you would rather see the dress on me in a beautiful ballroom than on a dressform in my messy living room. 

Since you last saw the skirt, I added oodles of trimming. For the bottom flounce, I used a doubled piece of pink chiffon. I decided to make the flounce double width, then fold it in half, gathering the two edges and stitching them down as one. This approach had two advantages: I didn't have to hem yards and yards of silk chiffon, and the flounce was then more opaque. Easier and prettier at the same time!

I added a row of the beaded trim to cover the raw edges of the chiffon. I still had a bunch of the trim left over, so I decided to arrange the rest in a sort of branching cascade down the left front of the skirt. I then accented the whole thing with more roses made with the pink silk. 

Lastly I added a belt of black velvet to the bodice, in order to provide a bit more definition to the waist. 


The dress was very well received at the ball, and was a joy to dance in. The short length made it easy to move in, it didn't take up as much space on the dance floor as the mid-19th century dresses I usually wear, and the sleeveless design gave me much more range of motion than I am used to having in Victorian fashions. 

The group of ladies who inspired this project, my lovely Gibson Girls, all did a wonderful job with their dresses as well. We all had a great time! Here are a few pictures of the group:

Quite a variety of colors and styles

Showing off our shoes and petticoats
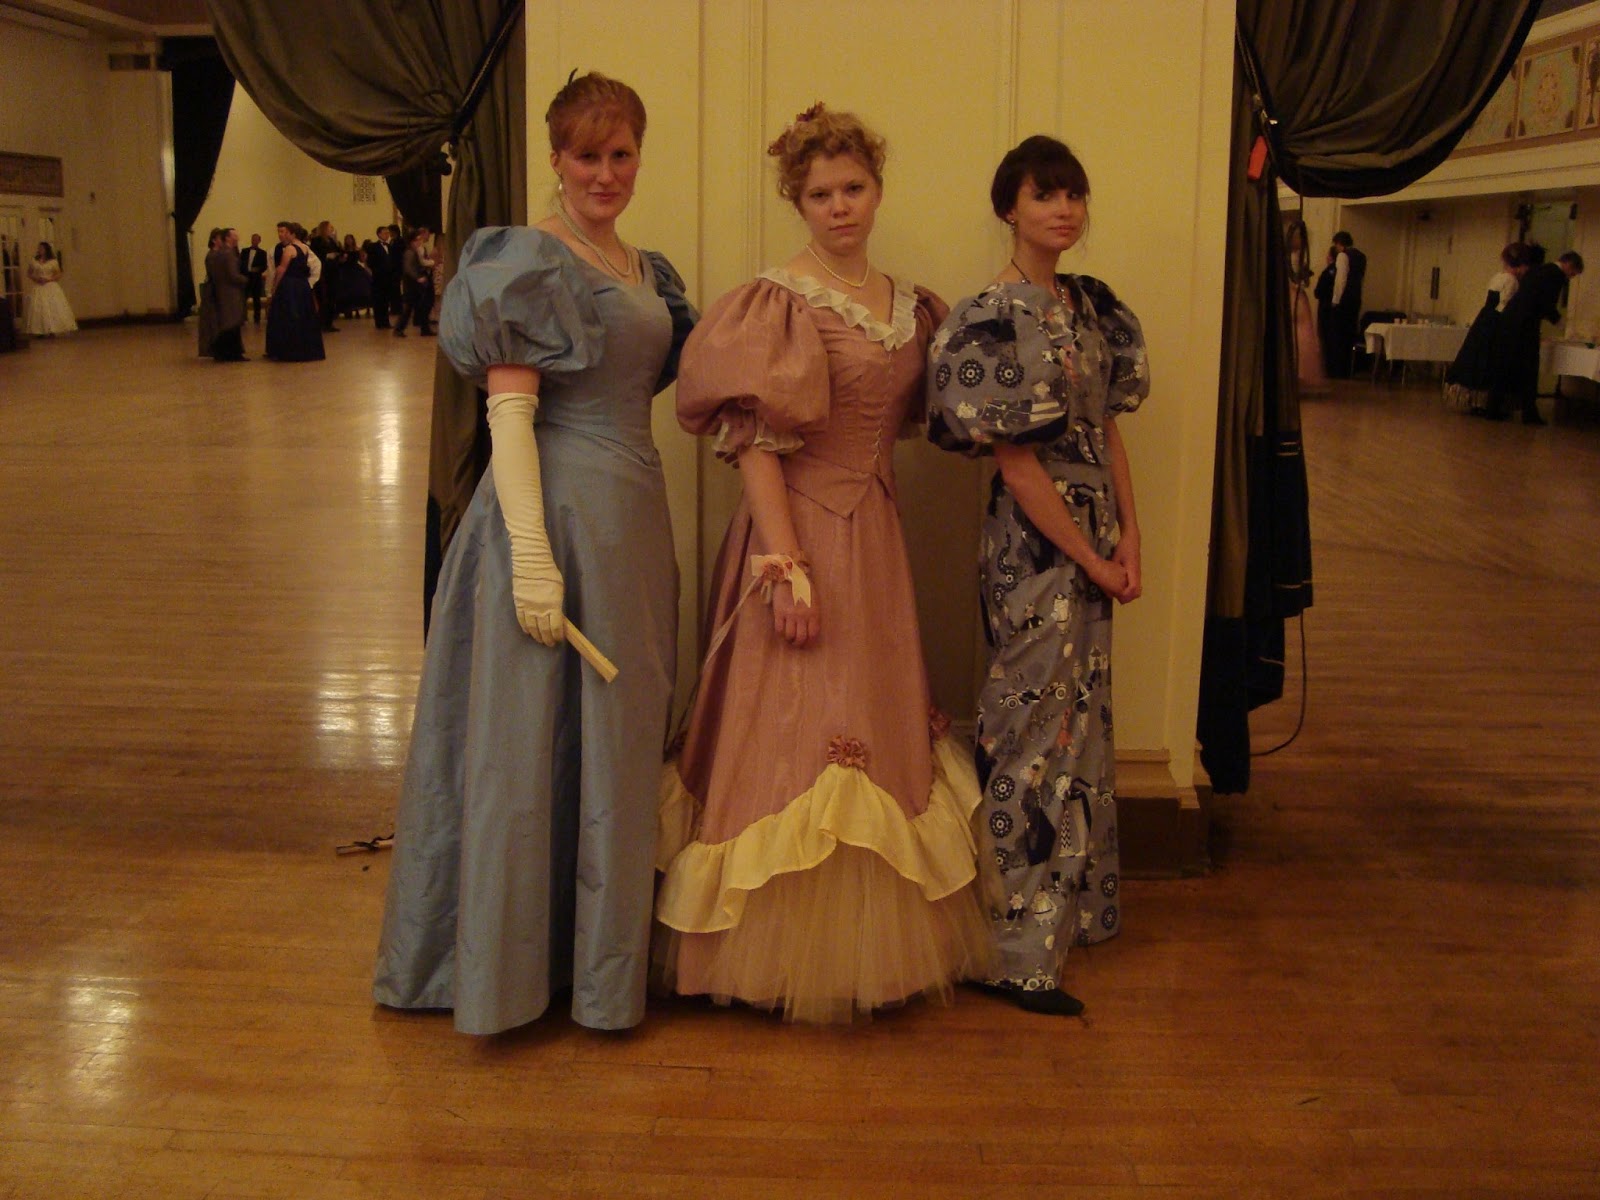
Three ladies who chose a slightly earlier silhouette: Jenny, Elizabeth, and Christine look fabulous with their floofy sleeves!

Vivien's trained dress was a show-stopper.

I love the silhouette from behind! (Read more about it on her blog.)

This was my favorite moment of the night: Jenny and Gregory recreated a charming drawing by Charles Dana Gibson.

Tells quite a story, doesn't it?


Another great victory of the night was my hairdo. After several rounds of trial-and-error, I figured out how to wrangle my fine, wispy hair into some semblance of a Gibson pouf. It took a lot of teasing, quite a pile of pins, and more than a few rats, but the results were better than I expected. 

The completed hairdo before the ball...

...and the tangled, messy aftermath! 


Here's a bonus: the decision to cover the dress in all those pink roses meant that this could become my entry for the next challenge in the Historical Sew Fortnightly! Here are the details:


The Challenge: #9 — Flora and Fauna (This is certainly the most floral dress I've ever made — 37 blooms from top to bottom!)

Fabric: Blue-green silk taffeta for the dress; pink chiffon, rosy pink silk taffeta, and black rayon velvet for trim; and pink acetate taffeta for the lining

Pattern: 1898 bodice from Period Costume for Stage and Screen as the base for my bodice, everything else was draped on the dressform

Year: ca. 1900

Notions: tarlatan for the hem, seam binding to finish the bodice inside, steel boning, petersham for waist stay, hooks and eyes, snaps, purchased beaded trim

How historically accurate is it? Fairly. It was inspired by period dresses in museum collections as well as period fashion illustrations. My techniques were based on period examples and period dressmaking manuals. My materials were pretty good (I used acetate taffeta for the lining where it should have been silk, and my velvet was a rayon blend). I used a purchased beaded trim instead of lavishly embroidering the dress as Worth would have done, because I am not crazy. Even with a few shortcuts, the majority of the sewing was done by hand, as it would have been done in the period. I would say 8 of 10. 

Hours to complete: I didn't keep track but my best guess would be upwards of 40.

First worn: to the Gaskell Ball on April 27, 2013

Total cost: I didn't keep track of this either, but my guess would be about $250. I overbought on most of my fabrics, meaning I have lots of leftovers that will be used for future projects. 


I'm very happy with how this dress turned out, but I'm even happier to be finished with it. Now I can move on to my next project, which will be something completely different... Details to follow!

Bodice Drapery

Time for some much-delayed updates on the Gibson Dress. For those of you who don't know, I finished it and wore it last weekend. It turned out just the way I wanted it, and it was very fun to wear.

Before I show you the finished pictures though, let's talk a little bit about the bodice. Last time I wrote about the bodice, I had completed the lining/base:


From this point, everything was draped on the dressform and sewn in place by hand.

I started by draping my blue silk on the bodice base to determine its final placement. I marked the outline of the area it would cover, tracing the area that would be exposed at the neckline, then removed the fabric from the bodice base. I then carefully filled in the neckline area with bias pieces of pink chiffon, pleating it gently and tacking it into place.

Here's a photo of what the bodice neckline looked like after this step:


I repeated the same process for the bodice back:


Next, I sewed bias-cut strips of black velvet onto the straps, pleating them slightly to add texture over the shoulder.

Here's a photo of what they ended up looking like in the back (the picture I took from the front turned out very blurry):


From here, I was so absorbed in what I was doing that I forgot to take step-by-step progress photos. Sorry!!

I pressed all the blue silk bodice pieces, then draped them into the bodice base starting with the back. I smoothed the back piece over the base while it was on the dress form, pinning it carefully around the edges. I then basted it in place at the side seams and wrapped the bottom edge inside the bodice base, basting it in place as well. I left the top edge pinned until I attached the beaded trimming, then sewed the trim down through all the bodice layers. Here is how the back turned out:


I repeated a similar process for the left side of the bodice, except that I folded the edge under at the side seam, and slip-stitched it down over the basting stitches on the bodice back. I turned the center front edge under and whip-stitched it to the front edge of the bodice base, then turned in the bottom edge, basting it inside the bodice base.

The right front was draped in a similar fashion, but instead of attaching it at center front, I left it loose to continue across the body. I pleated this drapery so that it would fall in gentle folds across the lower bodice area, ending at the left side seam. I finished the bottom edge of this drapery piece by interlining it with a bias strip of tarlatan, folding up the bottom edge of the silk, and catch-stitching it to the tarlatan. I folded under the end of the drapery and stitched it neatly in place. It closes at the side seam with hooks and thread bars.

Once all the drapery was in place, I sewed a band of my beaded trimming along the top edge of the right side drape, from the top corner just underneath the velvet strap, all the way to the left side seam.

At this point I started adding some of the roses I made out of my dusty pink silk to the left shoulder area. Here's the front at this point:


Lastly, I added some little drapey pieces of the pink chiffon to the shoulders, then put on a few more roses for good measure. 

The completed bodice:


Next up, the skirt trimming and the finished dress!!

Monday, April 22, 2013

Gibson Girl Skirt

I finished the basic construction of the skirt for my Gibson Girl gown about two weeks ago, but I didn't get around to photographing it until today. Here it is in its un-trimmed state:

Front 


Side-back 


Back 


Laid flat — this shows how simple the shape of the skirt is. The only seam is at center back (top straight edge in this photo). Additional shaping is provided by one small dart on each side of the waist. 


Construction details:

First I made the foundation skirt, a free-hanging lining attached to the outside skirt only at the placket and waistband. It serves as a petticoat, providing shape and structure for the fullness of the skirt. I cut the foundation on the same pattern as my skirt, but made it about 1-1/2" shorter. As seen above, it is a partial circle skirt, cut so that the majority of the fullness falls in the back. Since the hemline is very curved, I used a 4" bias facing as a hem. I followed period examples and interlined the hem with a bias strip of tarlatan, a lightweight, open-weave cotton that is heavily sized. It is light but firm, and when cut on the bias, behaves much like modern horsehair braid, providing structure and body without stiffness or weight. I added a dust ruffle inside the skirt, to help the bottom stand out from the legs while wearing it. The ruffle is about 6" deep, pinked on both edges, and gathered over a thin cotton cord.

The outside skirt is cut to "dancing length", just skimming the tops of my feet. It is hemmed the same way as the foundation skirt, with a 3" bias facing (without interlining, however).

Here are detail shots of the hems:

Lining dust ruffle


Lining hem


Skirt hem


The skirt and foundation are joined at the placket, which consists of a 1" underlap of the outside fabric. The placket closes with snaps, which began to be used during this period. Since there is no pleating or fullness in the skirt where the placket is, I thought snaps would be best for keeping the opening concealed. Both skirt layers are attached to a 3/4" wide waistband made from the blue silk. The waistband closes with two hooks and eyes.

Skirt placket and waistband


Now the skirt just needs trimming! I will be adding a deep chiffon flounce, a band of beaded trimming, and some accents made from a deep pink silk.

The bodice for the dress is nearly finished as well. More details on that coming up soon!


Monday, April 8, 2013

Gibson Girl Bodice Base

It's time for a progress update on my Gibson Girl gown. I finished the bodice base about a week ago. It took forever! Sewing the bodice was quick and easy since I was good and made a proper mockup to adjust all the fitting issues beforehand, but I spent several days just on the finishing.

First I trimmed, clipped, and scalloped all the seam allowances. Then, I overcast them all by hand. I sewed boning casings to each seam, again by hand. To ensure that the bodice sits smoothly over the boning, I followed a process described in period dressmaking manuals. As I stitched the casings down to the seam allowances, I left extra ease in the tape for a few inches in either side of the waistline, where the body has the most inward curve. Then, when I inserted the boning, I stretched the bodice lengthwise, causing the boning to bow in slightly. If you don't follow this process, the bodice may crinkle slightly at the waist when worn. It is a simple but ingenious way to ensure a smooth fit.

Next, I finished the neckline with a cotton ribbon as a facing and ran a narrow ribbon through it to use as a drawstring to draw up the neckline as needed. I then applied bias facings to the armscyes and to the bottom edge, which I interlined with a bias strip of tarlatan to give it structure. Lastly, I made a waist stay out of petersham and tacked it onto the back seam allowances. I sewed the bodice seams by machine, but after that every step of the process was completed by hand. The only shortcut I took was to use hook-and-eye tape for the bodice closure, instead of sewing on individual hooks and eyes. It's not the prettiest finish, but at least I was able to use my machine!

Here's the completed bodice base:

On the dressform


Back view


Laid flat


Inside 


Armhole facing


Bottom Edge

Pretty soon I can start working on the parts people will actually see!!

I have made a lot of progress on the skirts (yes, there are two). As soon as the outer skirt hem is finished, I'll post some pictures.

Gibson Girl Hair Accessory

For Challenge #7 of the Historical Sew Fortnightly, I made a small and simple hair accessory to wear with my upcoming Gibson Girl evening gown. I have been hard at work sewing the dress and have made a lot of progress (I'll post some updates very soon). All the sewing time I've had lately has been dedicated to that epic undertaking, which is why I haven't been blogging much lately, and why I didn't complete a project for Challenge #6 (I have several striped garments in planning stages, but just didn't have time to work on any of them this month). Taking a break from garment construction to whip up this accessory was a welcome break.

The window of time I am focusing on for this project is the years right around the turn of the century, 1899 to about 1903. If you spend as much time looking at fashion plates from that period as I have, you will notice that the increasingly voluminous hairstyles are often accompanied by sprays of feathers, flowers, and/or perky ribbon bows.

Here are some examples:

1899
The lady on the right has a spray of black plumage on her head.


1900 
Get past her giant chest bow for a minute, and see the arrangement of ribbon loops in her hair.


1901
Her plumage is quite impressive.


1903 
I just love the jaunty black bow. 


And here's my version (modelled on my most recent attempt at giant Gibson Girl hair):

The ribbon bow, which seemed pretty big when I made it, is dwarfed in comparison with my bouffant updo.

A side view 

And the hair accessory on its own. 

Making it was more complicated than you might think. The feathers are small clusters of fronds that I stripped from an ostrich drab. I bound them together clump by clump, wrapping their bases in thread as I went. I then constructed the bow from black velvet ribbon, and attached the feather spray to the back of the bow. I didn't add anything to affix it to my hair, but simply anchored it in my bun with a long hairpin. 

The details:

The Challenge: #7 — Accessorize

Fabric: None

Pattern: None, just improvised

Year: ca 1900

Notions: 1 black ostrich drab, 1/2 yd. 2" wide black velvet ribbon, black polyester thread

How historically accurate is it? I don't have any historical examples to compare it with, but the techniques I used are compatible with period millinery. 

Hours to complete: 1 hour (not counting the updo!)

First worn: Will be worn April 27 at the Gaskell Ball

Total cost: about $6


Wednesday, March 20, 2013

Gibson Girl Gown Progress

This week I finally started my Gibson Girl ball gown!

After much study and deliberation, I have formulated a game plan. My vision for the dress is a bodice based loosely on this dress:
1898-1900 Jacques Doucet, Met Museum
I love the draped crossover bodice with chiffon peeking out at the neckline, and I'm really into the idea of shoulder drapery, though I will probably use more chiffon instead of flowers. 


I want my skirt to have a little more visual interest, so I'm thinking about a flounce and embellishment inspired by this dress:
1898-1900 House of Worth, Met Museum
Though I'm sure I won't have the patience to cover my flounce in spangles, I very much like the line of applique/embroidery where the flounce attaches to the skirt. 


To plan the actual construction of the dress, I have been consulting all my usual reference books and resources. In addition, I have found Cathy Hay's Worth Oak Leaf dress diary especially insightful. She faithfully recreated an incredible 1903 evening gown by the famous design house, right down to the insanely detailed embroidery. Here's the original dress:
1903 House of Worth

And yes, her version is about as jaw-droppingly beautiful as the original. While I have absolutely no intention of putting even a tiny fraction of the effort she did into the embellishment of my gown, I found her notes, photographs, and diagrams of the dress immensely helpful. Please go visit her site and enjoy it as much as I have. 

In addition to her dress diary, I have studied period patterns and dressmaking manuals, patterns taken from extant dresses, and photographs of dresses in museum collections. Based on these sources, I have identified a few nearly universal techniques for the construction of evening/ball gowns from this period: 

1. The bodice, rather than being flat-lined, is built over a separate silk lining, sometimes an off-white color, sometimes a shade to compliment the outer fabric. This bodice base is boned and has a petersham waist stay, and has its own closure in either the front or the back. 

An example:
1897 House of Worth, Met Museum
This photo is intended to show the stay tape and label, but it also shows inside of the bodice base. Notice all the vertical seams and the hand-finishing. Seam allowances are overcast, bone casings and stay are hand-stitched in place, and the bottom edge is finished with a facing or tape. You can see the outside fabric (actually a piece of ribbon in this case) peeking out from the bottom. It is clearly separate from the lining. 


2. The outer layers of the bodice are arranged and applied to this base. They have their own closure, either concealed in their drapery, or along one of the side seams. The careful placement of closures completely disguises the openings. 

The same bodice as above, but from the outside this time:
1897 House of Worth, Met Museum
It is clear that all the frill and frouf that constitutes the outside of the bodice is lightly applied to the exterior, and is not in any way structural. The boned lining provides all the structure, the rest is just decoration. This is true even of more solid-looking bodices, like the silver-blue Worth dress above. 

Here is its bodice laid flat:
1898-1900 Worth, Met Museum
If you look closely at the inside back edge, you'll see the outer fabric floating free from the lining, which has a drawstring at its upper edge (also a common feature). That back piece wraps across the back from the right hand side of the body to the left, where it fastens with hooks and eyes along the side seam (just visible in the full-length photo up above).

3. The skirt is usually separate from the bodice and has a free-hanging lining. This lining serves as a petticoat, with rows of ruffles to help fill out and support the bottom of the skirt. The skirts close at the center back. 

You can see the free-hanging skirt lining in this dress:
1899 House of Worth, Met Museum


Within the framework of these general guidelines, there is a huge amount of variation in the patterning, cut, layering, and ornamentation. The bodice linings are fairly standard, following the common bodice shapes of the 1890s, but the skirts can be cut in any number of ways. Most are gored, but the size, shape, and number of gores vary widely. Some skirts are cut with only a single front gore, paired with large circular-cut panels extending to the back. A very few skirts are cut in a single-piece, circle skirt layout, though the narrow width of period silks makes this an uncommon technique. The gored skirts tend to have some pleating or gathering where the back portions attach to the waistband, while the circular skirts tend to be fitted much more smoothly over the hips. 

I prefer this smooth-fitted approach, and also like the easiness of a circular skirt — fewer seams — so I plan to cut my skirt as one large circular shape. If you take a look at the diagram of the Worth dress by Cathy Hay, you will see the shape that I am using for my skirt. This is supported by a dress in Janet Arnold, as well as a few period patterns in The Voice of Fashion.  

I have decided to make my dress without a train, even though they were very popular in this period. Every extant dress I have seen has a long sweeping train, but I personally have no desire to experiment with dancing in one. I have seen written references to "dancing length" dresses, showing that at least some women thought about foregoing the fashionable trend in favor of practicality. But without having seen even one example of such a dress, I am doubtful as to the historical accuracy of my choice. Since I am wearing this to a ball where I will be dancing for hours, I have decided that I am willing to compromise historical accuracy in order to be able to dance without fear of me or anyone else stepping on my elegant train and tearing it to pieces. These are the choices we costumers must sometimes make. 

Here's a lovely painting showing ladies dancing in dresses that do not appear to have long trains:
The Ball, Victor Gabriel Gilbert

For my bodice base, I am using the basic 1890s bodice pattern from Period Costume for Stage and Screen (pg 146-7). I considered using the Truly Victorian 1892 Ball Gown Bodice, which would have given a similar shape (raising the bottom edge, and dropping the giant sleeves of course), but decided to save my money and just work with the pattern from the book. I was very lucky, the pattern required very little alteration once I scaled it up. 

While doing this research and planning my patterns, I was also collecting materials. I found a muted blue-green silk taffeta for the main body of the dress. To trim it, I decided on a pale pink silk chiffon for the drapery and skirt flounce, and a peachy rose silk taffeta for accents. For lining, I settled on a pale pink acetate taffeta; I would have bought silk, but couldn't justify the extra expense for something that no one will really see. It has a similar hand and body to silk, and it breathes. At $3/yard, I couldn't resist.

For embellishment, I bought a beaded trim in grey and silver that I thought was somewhat evocative of the cloud motifs on the blue Worth dress above. I also plan to accent the dress with black velvet. 

Here's a picture of all my materials together:
From left to right: pink acetate taffeta for my lining, blue-green silk taffeta for the body of the dress (shown with the grey and silver beaded trim for embellishing the skirt), peachy pink silk taffeta for an accent color, pale pink chiffon for the neckline/shoulders and the skirt flounce (shown with black velvet ribbon, which will get worked in somewhere)

I have already made mockups of my bodice base (from Jean Hunnisett) and my skirt pattern (from the Oak Leaf dress and a dress in Patterns of Fashion by Janet Arnold, pg 50-51). I cut out the bodice lining, the skirt lining, and outer skirt over the weekend, and will hopefully start sewing my dress this week!

I'll post an update once I have something worth seeing.