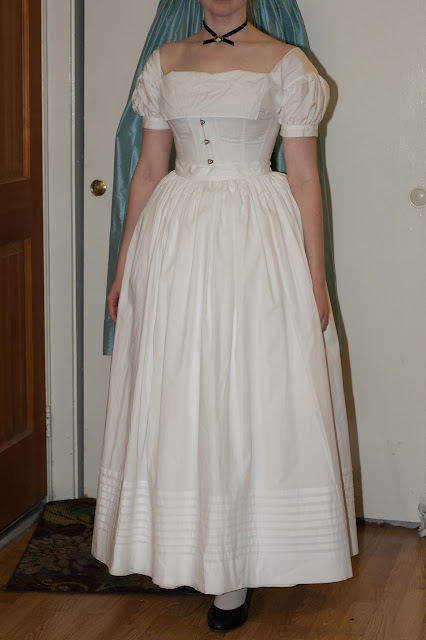
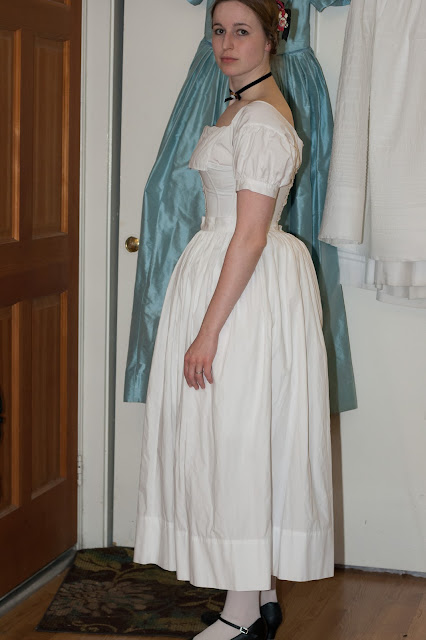
Here are my 1830s-1840s underpinnings, as worn last week with my blue late 1830s ball gown (seen hanging in the background of all these pictures). They were also worn in December with my brown wool Dickens Fair dress.
The finished effect:
Now let's break down what goes into giving me this silhouette.
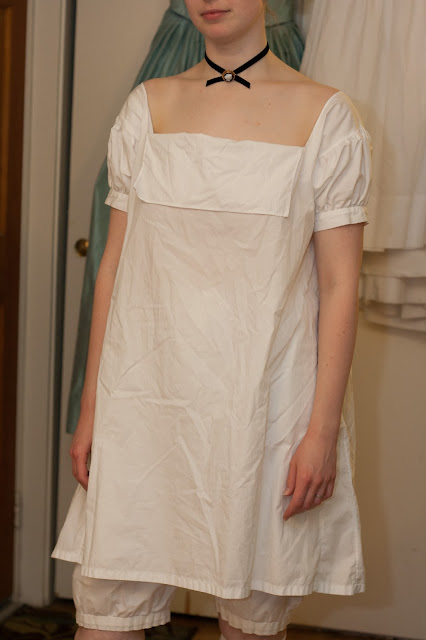
First, a hand-sewn chemise made from diagrams and instructions in the Workwoman's Guide. It is a transitional style, bridging the gap between the squares-and-rectangles shifts of the early 19th century and the curved and gathered yoke chemises of the 1850s and 1860s. It is still cut entirely in rectangles and gores, but has full, gathered sleeves and a front flap to cover the top edge of the corset:
I wish I had pressed it before taking these pictures.
I based my chemise primarily on this historical example:
Luckily for me, this chemise is documented in Costume in Detail (pg 173-4). It also has many traits in common with chemises in the plates for the Workwoman's Guide. Mine is hand-sewn from pima cotton broadcloth (though it should more properly be linen). I think it is beautiful, and it is perfectly comfortable to wear under my day dress, but I don't think I'll wear it again with a ball gown. It is very difficult to get it to sit right with a lower neckline, and when dancing the shoulders tend to fall down. They then bind and pinch and make my shoulder/upper arm very uncomfortable — not ideal for an evening of dancing. This doesn't happen when worn with a higher neckline, as the chemise can then sit properly up on my shoulders.
Over the chemise, I wore my go-to mid-19th century corset, a heavily modified version of Simplicity 9769:
It fits pretty well, is fairly comfortable, and gives a nice silhouette. However, I wish it had more hip flare (something my corsets pretty much always need). I also experience some lower back pain after a few hours of dancing in it, probably a consequence of not having enough room in the back hip area. I think this summer I will make a replacement, maybe something with gussets and hip gores to allow for a curvier shape.
Next I added a bustle pad:
I find that despite my natural rear padding, my skirts don't achieve the desired fluffy bell curve in the back without some additional padding. I initially tried a smaller round-ish pad, maybe 6-8" across and 5" or so deep. (I wore that bustle with my Dickens Fair dress.) I found, however, that it didn't provide quite enough floof for my taste, and so made this larger, thicker bustle the morning of the ball. It extends all the way to my sides and is more tightly stuffed than my last bustle. In these pictures, it almost seems like too much bustle, but the wool batting inside compacted slightly as the night wore on, and I'm quite happy with the resulting shape. It is sewn from white linen, with cotton twill tape ties.
Now for the petticoats:
First is a simple base petticoat of two 45" panels of pima cotton broadcloth, hemmed to lower-calf length:
The next layer is a corded petticoat:
I labored over this for months (all hand-sewn, remember), but I think it was well worth it. It is two 45" panels of plain cotton muslin with Sugar 'n' Cream cotton yarn for the cording. When I started, my plan was to fold up a deep hem, sandwiching rows of cording between the fabric layers, as shown in this tutorial by The Laced Angel. You can see that there are about 35 rows of cording at the hem of the petticoat done in this style. Those 35 rows took forever!! (Did I mention I was doing this by hand?)
Miles and miles of cording!!
I decided to speed things up a bit by changing to another method of cording, the one demonstrated in this tutorial at Historically Dressed. Each row of cording is sewn into a small tuck in the fabric, wrapped tightly the same way you would make your own covered piping. With this style of cording, each tuck takes out a little bit of the petticoat's length, so remember to plan accordingly. Otherwise, you'll have to do what I did and add some extra fabric on top to make the petticoat long enough. This method went much faster and enabled me to actually finish the petticoat, instead of throwing it away from myself in frustration. I started by spacing my cords about 1/2" apart, but the spacing got wider as I went up the petticoat (and grew increasingly impatient to be finished with it). Luckily, that was a common look in period examples, like this one:
1830s Metropolitan Museum
As an additional FYI, I find that this second method of cording gives much more volume and support than the first method. They both stiffen the fabric considerably, especially with a good starching, but the tucked cording resists crumpling more than the sandwiched cording.
On top of the corded petticoat is a plain petticoat with a deep hem and one 1/2" tuck (added to shorten the petticoat):
And one final petticoat, this time with a shallower hem and eight 1/2" tucks (it started with seven, as I prefer the aesthetic symmetry of odd numbers, but this petticoat also needed shortening):
Look at that fluff!! Who needs hoop skirts anyway? I love the soft bell silhouette, and all those layers are wonderful to move and dance in. Instead of the pendulous swinging of a crinoline, you get a soft, rustling swirl of fabric. It's delightful.
So much floof!
The crucial step to ensure that you get the desired volume with petticoats alone is to starch the heck out of them. I use plain old cornstarch. The process in brief:
1. Make a solution of starch and water. It doesn't take much — 1/4 cup starch to a quart of water, dissolving the starch in a small amount of water first before adding the rest.
2. Boil it for a minute or two until it thickens.
3. Let it cool, and dilute it as necessary.
4. Dunk the petticoats, then squeeze out the excess (I use a spin cycle in my washing machine).
5. Hang to dry.
6.When you're ready to press them, it's best to dampen them slightly first. This gives them a smooth glossy finish.
Here's a great shot of my petticoats after starching (but before pressing):
They are literally standing up on their own.
(The cat is included for scale — no, he was just being nosey.)
Starching takes a long time, and must be repeated every time you wash the petticoats, but it is so worth it. Not only does it greatly enhance the floof factor, but it makes the fabric crisp and rustley — very satisfying.
To see what these petticoats look like under dresses, visit these previous posts:


The silhouette is very nice indeed and I'm in awe of your patience with hand-sewing the corded petticoat, it really paid off!
ReplyDeleteThose are beautiful! Wow! I am just getting started with Civil War costuming, and am looking around for a good tucked petti tutorial - do you have one or know of one? tx!
ReplyDeleteThis is so neat! So much great information! I am sewing an 1840's dress right now and want to make a corded petticoat. Did you sew the petticoat up first then do the cording in a round? It all looks so great!
ReplyDeleteout of curiosity, what is the function/purpose of the first petticoat? the one under the corded one? I am making underpinnings for a ballgown and came across your lovely blog!!!
ReplyDeleteI think it’s to protect the legs against irritation from the cording
DeleteSo pretty! Your sewing is lovely!
ReplyDeleteLovely work and pictures, thanks for the brilliant tidbit about starching petticoats!
ReplyDeleteKenali Jenis Permainan Ayam Bangkok Dari Sumber Terpercaya hanya di suara ayam bangkok asli
ReplyDeleteGreat read thhanks
ReplyDelete